So like most people going about their day at work, we look at something and go I wish there was a thingimabob to solve this minor annoyance.
Well for me that was a bookend that can clamp on to my cart to keep a row of books upright when I don't have enough to stretch from one side to the other. So like any proper Maker, I went looking at what everyone has done one because my design chops are below the minimum standard I place on myself "I am my own harshest critic!" and I visited Thiniverse.com . What I ended up finding was this (https://www.thingiverse.com/thing:3120347) a shelf separator for a simple board shelf.
Thinking I was off the the races I made my way to the CoLab on the Third floor of the Lincoln Library and printed it off and after a brief 5 hours later I had...something that didn't quite fit my needs. the spacing for the thickness of the shelf was to small so I could get the majority of it on but lacked the snugness I was hoping for without risk of breaking the print. So after a tearful night lamenting my error, I came into work this morning with a plan.
The Plan was to Modify the design in TInkerCAD, a free Computer Aided Design software that also lets you learn how to write computer code and wire circuits. Well first thing I need to know was how thick the shelf was to increase the spacing for the separator to fit snuggly, than to reduce the arm that reaches under the shelf as well because the metal carts we use are very thin material but strong so I jus to reach past that short piece. So I slipped back to CoLab and got the calipers we have there to measure down to the millimeter how tight my tolerances need to be...I did say I wanted to be snug.
Once I had those measurements I created a Box in the TinkerCAD software so I could check my tolerances and sizing. Now TinkerCAD is a powerful tool but since the file I was using was not my own I had to get Creative with how to fix my issue. So what I did was simply duplicate the separator, much like how copy and paste works when typing up documents I had a perfect replicant of the shelf so I moved it to the side and created a hollow box, so what a hollow box is is not unlike an eraser, I put what I didn't want in the box and with the replicated separator and I combined them to merge into a new shape, which with a hollow box meant I removed all the unnecessary parts. Then I did the same thing on the original separator.
Now to make sure my spacing was right I took the box I made of the dimensions and placed it where the shelf would sit after I printed it out and aligned the two halves before merging them together to for a singular piece. Now to aid in the alignment I had something called snapping turned on, this meant I could only move the object in predetermined increments and I could be sure I would have everything just perfect. Next I had to do almost the same thing again but this time to the arm length, it being way to long for my needs in the original form. So I again duplicated the separator, used a hollow box and used snapping to get the arm length down to a size that I felt was just right.
Once I had what I felt was the ideal Shelf Separator I saved a copy of the Object to my computer in a file type called stereolithography or STL for short, this file format saves data in a three-dimensional Cartesian coordinate system (a bunch of triangles in a specific pattern) and sent it off to the CoLab to get it printed off tonight.
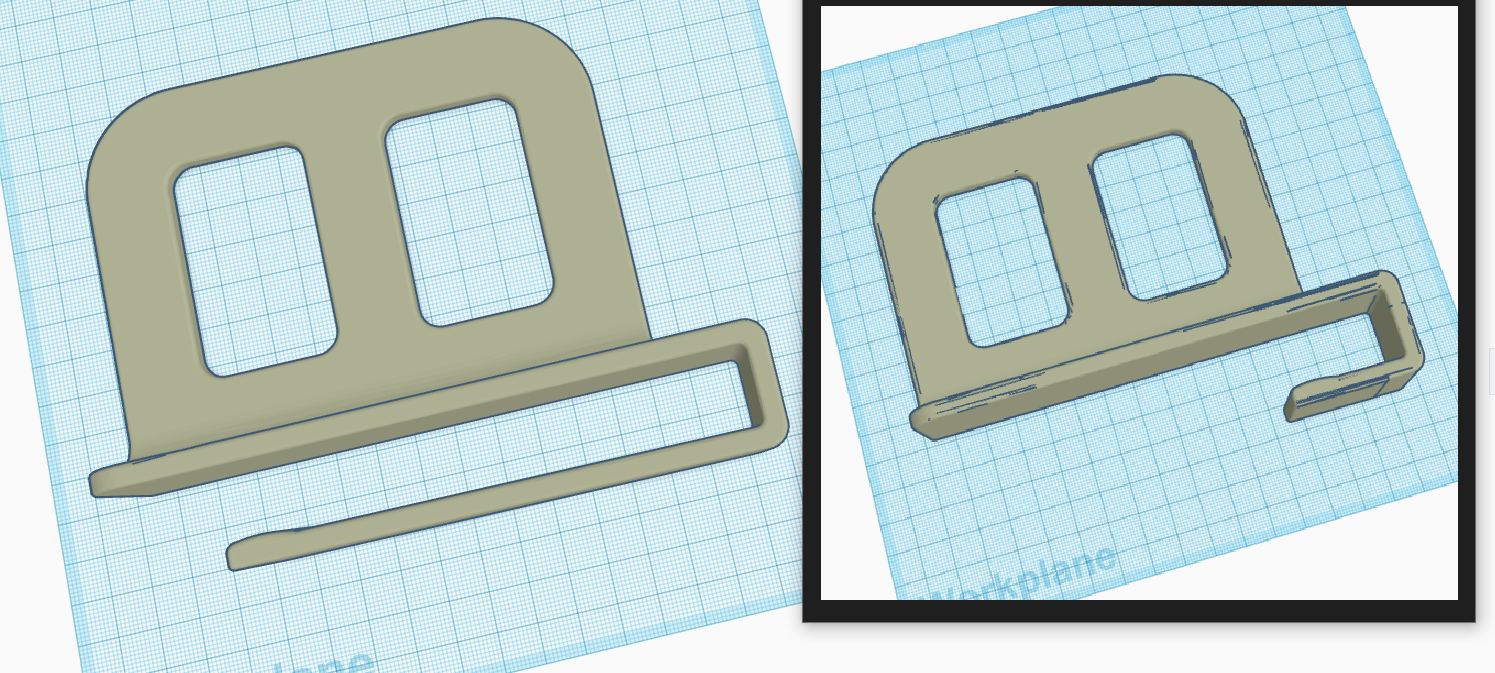
I included an image of the before and after of the file, this whole process took about 45 minutes to complete and it will take around 4 hours to print out.